
How to Print and Assemble PDF Patterns
As indie pattern companies move more and more into designing PDF patterns, it seems like a good moment to have a refresher on how to print and assemble PDF patterns correctly. It is very easy, but for those that are new to it, there are a few key moments that you really want to do right. So I will talk you through the entire process from start to finish. Okay, let's get to it!
1. Find the Test Square
First, you need to find the page that contains the test square and print that page. Every PDF pattern will have a page that has a shape on it that is a specific size. Ours has a 4" square, usually on page 1 of our PDF patterns. But sometimes due to the shape of the pattern pieces we have to move it to another page. How do you find this page? There are two ways. You can either open the print-at-home PDF file and locate it by scrolling through the pages, or you can look at the print-at-home chart in the instruction booklet, pictured below.

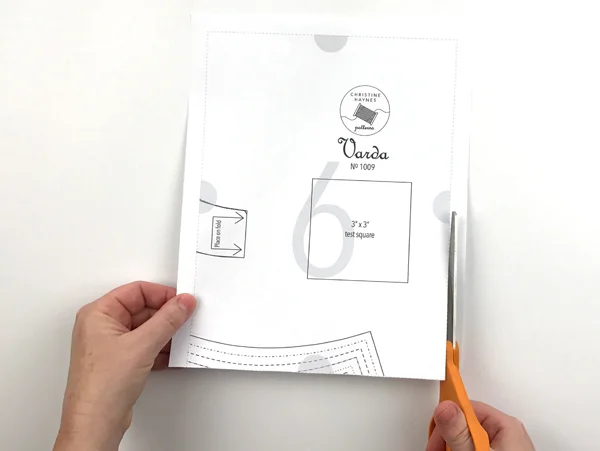
2. Print the Test Square
Once you have located the page that contains the test square, you want to print just that page. The reason you are printing this 4" square is to make sure it is sized correctly, thus making the pattern the correct size as well. You do not want to print all the pages, only to find that the square was too big or too small. You just want to print that single page to confirm the square is the correct size, then you can move onto printing the rest of the pages.
To print the test square page, open the print-at-home PDF file in a PDF reader software, like Adobe Acrobat or Apple Preview. Note: for copyright reasons, the files cannot be opened in an editing software, like Adobe Illustrator. Once you've opened the file, ask the computer to print the file, but only the page with the test square on it.
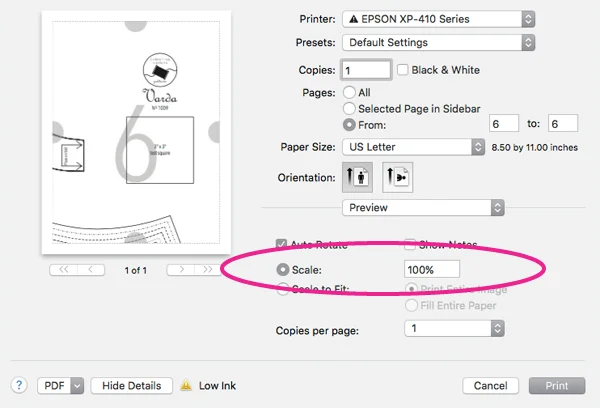
Now this is the important part: you want to print it at 100% scale. You do not want the computer to enlarge it to fill the page, nor shrink it to fit the page. You want it to be printed full size. How do you do that? Simply make sure the print window looks like these examples below:
Adobe Acrobat print window

Apple Preview print window
Once you've printed that page, you want to measure the square to make sure it is in fact 4" square. If it is, you can now print the remaining pages. If it is too big or too small, double check that all the scaling buttons and settings are correct and try again. If it still is too big or too small, and you've checked everything you can think of, then it might be time to ask a professional. Usually this goes just fine and you don't have to bring in the heavy hitters, but all printers and computers are different, and there might be something set in your printer preferences that we cannot guess from afar.
3. Trim the Pages
Once you have all the pages printed successfully, it's time to trim them to assemble them together. I find that if you trim all the edges of the pages, it's really hard to line up a cut edge to another cut edge. So how I prefer to do the assembly, is by trimming only the right and bottom edges of each page, so when you go to assemble them, you simply overlap the cut edge onto the uncut edge, and tape it together. Also this cuts your trimming time in half! So it's a win win!
Grab your paper scissors, and trim the right and bottom edges of each page, right up to the gray dashed line. Do not cut that line away! You should still see the line after trimming.
Continue trimming all the pages until they all have the bottom and right edges trimmed off.
4. Assemble the pages
Once you have all your pages printed and trimmed, it's time to assemble them all together. Refer to the chart above that is included in your instructions on how the pages are going to fit together. You're essentially forming a giant puzzle. But since size is a key factor in your pattern, you really want to be sure to line everything up as best as you can. Overlapping the pages beyond the gray dashed line, or leaving gaps between them, will cause the pieces to be too big or too small, and then the fabric pieces once cut might not go together well. So take your time and make sure everything lines up just right.
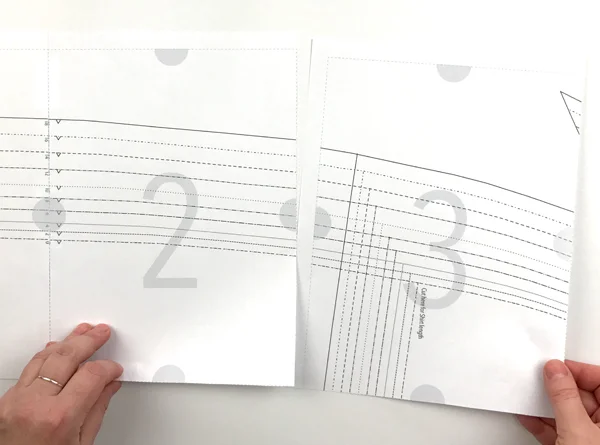
Slide the uncut edge under the previous page, so the trimmed right side lines up with the untrimmed left side of the next page. So above, page 2 has the right side trimmed, and page 3 still has the margin of paper on the left side. Page 2 is overlapping that margin, allowing the gray dashed lines to meet. The gray circles will also line up, as will the actual pattern piece lines. Once everything is lined up, tape the pages together, and continue on until that row is assembled.
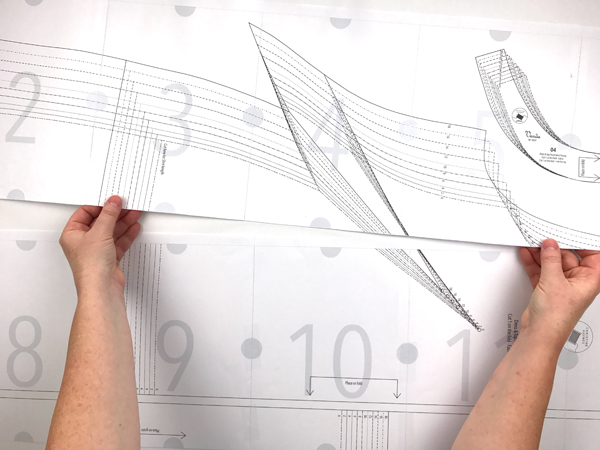
I prefer to assemble each row, then join those rows together. Below you can see the first row joining the second row, forming the pattern pieces. Just like when joining single pages, the cut edge of the upper row overlaps with the uncut edge of the row below it, making it easy to line up the gray dashed lines and tape in place.
Once you have assembled your rows, the job is now done! This isn't most people's favorite task to do, but once you do it a few times, you get faster and faster at it. And there is something wonderful about working with paper instead of tissue, which is far more precious. Though even someone who doesn't mind this task probably doesn't want to have to do it again, so once you have your whole PDF pattern taped together, I suggest tracing off your size preference with Swedish tracing paper and a mechanical pencil. That way you don't have to cut the PDF pattern and it remains ready for future use!
As always, contact us with any questions you might have about this process. We're happy to help!