How to do a FBA on the Sylvie Dress
When the Sylvie Dress pattern originally launched in 2015, I asked my friend Devon Iott of Miss Make to do a tutorial for the blog to show how to do a full bust adjustment (FBA) and a small bust adjustment (SBA) for the pattern. Because the bust darts are a little different, this might be new to you! Below is the original FBA tutorial from 2015. Find the second post here on the blog for the SBA tutorial. Thanks Devon and I hope you all find this useful!
Full Bust Adjustment Tutorial - The Sylvie Dress
Hey everybody! I’m Devon from Miss Make, and we’re going to go through the steps for doing a full bust adjustment (FBA) on the Sylvie Dress, which are a little interesting because of the triple bust darts. Some signs that you might need a FBA are if the dress fits in the shoulders/armpits but strains across the bust, or if, when the bust fits, the shoulders and armpits are loose and baggy.
The Sylvie Dress pattern (and all of Christine’s patterns) are drafted for a B cup. This means that there is a 2” difference between the upper bust and full bust. If you have a difference of more than 3”, then you might want to do a FBA.
The upper bust is the measurement around your chest under your armpits, across the flat part of your chest. The full bust is the measurement around the fullest part of your bust. Both measurements should be taken with the tape measure pulled snug (but not digging in), with as few clothes on as possible and while wearing the undergarments you plan to be wearing with the dress. Make sure the tape measure is parallel to the floor and you’re not hunching/holding your breath/sucking it in. In other words, just try to stand normal.
You’ll want to choose a size based on your upper bust measurement. So if your upper bust is 34”, that means the patterns assumes your full bust will be 36”. So you’d want to cut a size 8 in the bust, even if your bust is 37”.
Next we’ll figure out our adjustment amount. In the above scenario, the actual full bust body measurement is 1” bigger than the pattern full bust measurement. So that will be the total amount we add. But since we’re only adding it to one half of the pattern piece (the other half will be added when the piece is cut on the fold), we’ll only add half that amount. So we will be adding ½” to the pattern piece.
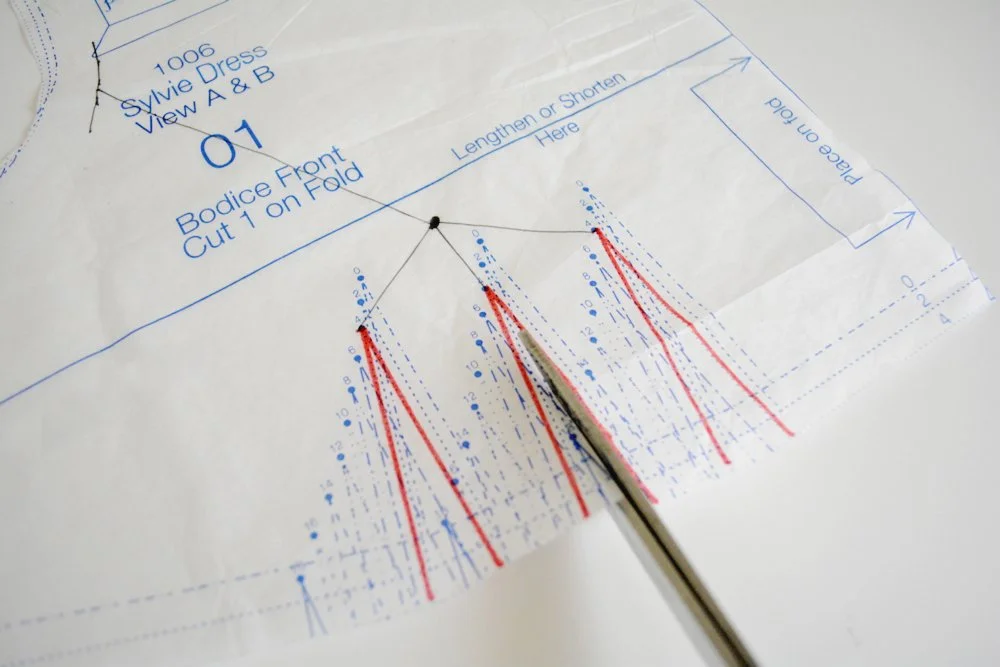
The darts we are working with are traced in red in the photos.
Okay, here we go!
Place paper patter over your body, aligning center front, and mark your bust apex.

Mark the stitching line about a third of the way up the armscye. (This means make a line 5/8” in from the curved edge of the armhole, since the seam allowance is 5/8”.)

Draw a straight line from the bust apex to the stitching line.

Now draw a line from the top of each dart to the bust apex.

Cut up through the center of the middle dart…
…along the short line to the bust apex. Turn the corner and continue along the longer line, to but not through the stitching line.

Snip to but not through the stitching line from the other side to create a hinge.

Lay paper underneath and tape right side down above bust point. Measure and draw a line to the left of the bust point for your bust adjustment. (Remember to add only half your total adjustment because this is just half of the pattern piece.)


Adjust left hinge so that bust point corner is aligned with line. Tape above bust point.

Now cut up through the center of the right and left dart, then along the lines to but not through the bust point to create hinges. Rotate the hinges until the added fullness is distributed equally among all three darts. Tape.

Use a curved ruler to add extra to the bottom edge to make the bottom even. Don’t blend or average the disparity, but instead start at the extended lower end of the bodice and continue to the center front. This adds the vertical length needed to accommodate a fuller bust.

Extend center front line down to meet new curved line. Make sure the new curved line intersects the center front at a 90º angle.

Redraw center and innermost dart points based on the height of the outermost dart point. They should end up being lower. Then redraw dart legs.

Fold darts on stitching line with dart uptakes facing towards side seam. Trim edge and reopen pattern piece.


Make a muslin and tweak as necessary.
Notes:
If your total adjustment is more than 1.5”-2”, it may be helpful to add an underarm dart by slashing from the side seam to but not through the bust dart to create a hinge, then spreading to distribute some of the fullness from the waist darts to the underarm dart. Otherwise the waist darts might become too pointy once sewn.
Everyone’s body is different, so this is definitely a starting point. You can combine it with other tweaks to get the perfect fit. But whatever you do, definitely make a muslin after any fit changes so you can make sure they work for you before cutting into your fashion fabric!