
Lottie Pattern Hack 2 Tutorial
In today's Lottie Pattern hack, I will be showing you how to turn the solid front piece of the dress or shirt into one that buttons up. This is a pretty simple change, but one that can really change the look and feel of the garment. It also adds a practical element for breastfeeding ladies or if you wanted to wear your Lottie a little more fitted and require the ability to open the garment to get it on and off, instead of pulling it on over your head.

In my gingham version, I made it in a vintage housedress style. There are a lot of other ways to style a button-up version of the Lottie, so don't limit yourself to the look of my version.

The key to changing the front from being cut on the fold to having a button placket is all about adding the right amount of fabric to the front so it overlaps correctly. The first pattern change is changing the marking on your pattern piece. X out the marking for "cut on the fold" and replace it with a grainline, parallel to the fold edge of the pattern piece.
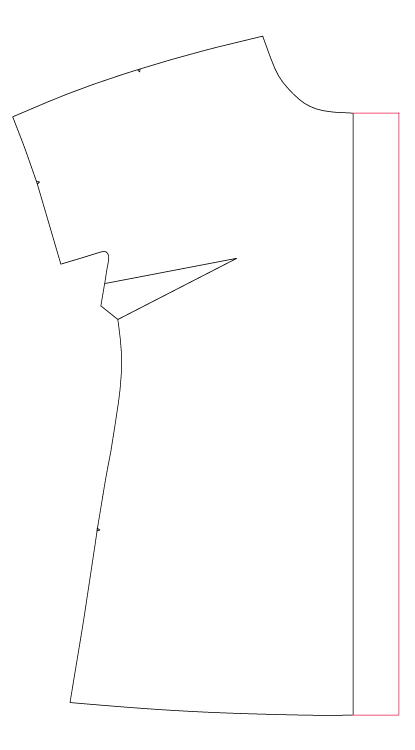
Next we want to add to the center front, to allow for the placket as well as for some overlap. Add 2 1/2" to the center of your front pattern piece. This will provide us with a 1" placket with 1" of overlap.

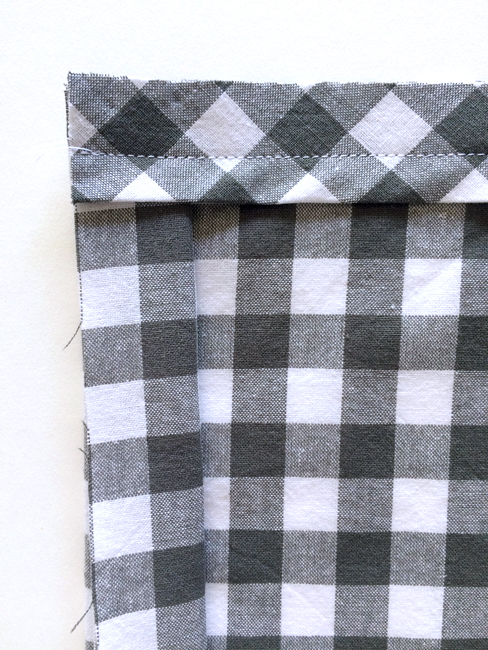
Cut your front pieces out, with this extra 2 1/2" added to each front piece so you have a matching pair like pictured above.
We also need to make a change to the bias binding that goes around the neck. Since the original piece is sewn in the round, we are gaining all the seam allowance from the seam where the binding is sewn on the short ends to form a loop. So our piece is now 1 1/4" too long. But, we just added to the center front pieces, so we need to do the following math, based on how the neckline will be once the plackets are sewn:
5/8" + 5/8" (seam allowances) = 1 1/4" too much length. 1 1/4" - 1" (overlap) = 1/4" too much length. So all we need to cut off is 1/4". Unfold your binding piece and simply cut 1/4" off one of the ends. Now it is the correct size with the seam allowances removed, but the overlap for the placket added.

First, take a moment and follow the instructions to stay stitch the necklines, sew the darts, the sleeves if adding them, the shoulder seams, and the side seams. The sleeve hems can be sewn or not, but everything else should be sewn up to this point.
For the plackets, we want to interface both sides for strength to support the buttons and buttonholes. Be sure to use an interfacing that suits your choice of fabric. Cut two pieces of interfacing 1" wide by the length of your pattern piece from the neckline to the hem, along the center front. Place the interfacing 1" away from the center front on the wrong side of the fabric, and press in place. For these images, note that the gingham check is 1/2" grid.

Fold the 1" piece of fabric between the interfacing and the center front over the interfacing, wrong sides together.

This part will sound confusing, but just stick with me. What we want to do is to fold the 1" placket to the right side of the garment, right sides facing and pin in place at both the neckline and the hem. So with the fold still in place from the last step, fold that 1" section and the interfacing section to the right side, right sides together. You will have three 1" sections folded on top of each other. Stitch through the placket area at the hem at the 5/8" hem allowance. Do not sew beyond the placket, but sew through all three folded layers and the interfacing. At the neckline, do the same, but sew at 3/8" seam allowance. This is going to help us have a finished top and bottom without doing any sort of bulky double fold with the placket.

At the hem, trim off the corner at the center front, through all three layers of the placket and the interfacing. Do not cut beyond the placket or the stitching.

Fold and press the binding in half, wrong sides together, just as instructed in the original version. The only difference is that yours is not in the round. With your front still folded as it was in the previous step, pin the bias binding to the neckline, right sides together, with the raw edges lined up at the top and the fold at the bottom. This should fit as pictured above with the raw edges on the short ends of the binding flush with the center front.
Stitch the binding to the neckline all the way around at the instructed 5/8" seam allowance. Continue as instructed in the original instructions to press, understitch, trim, press to the inside, and stitch in place.

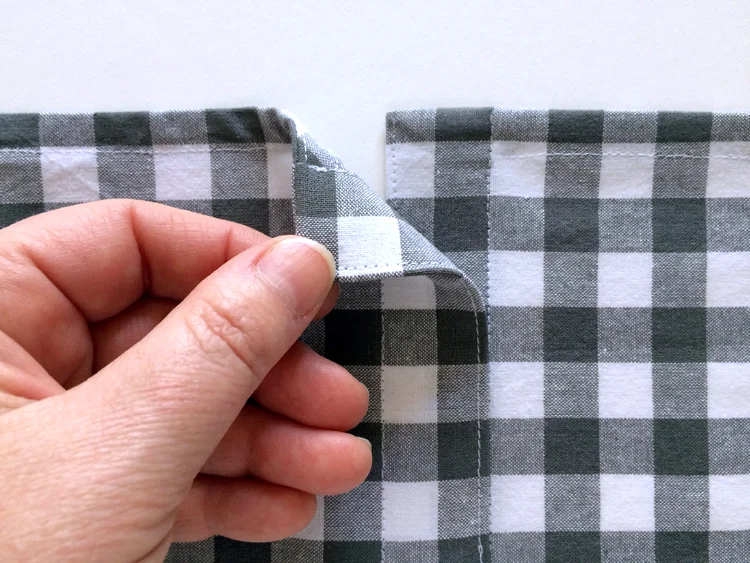
Your neckline should look like above, with the folds of the placket still folded and the binding sewn to the neckline. Trim the corner at the top center front to reduce the bulk.

Flip the binding to the inside of the dress. Take a moment to carefully form your corners at the top of the placket as pictured above, as well as at the hem where you sewed and trimmed the corner. The binding at the neckline, and the hem allowance at the hem, will naturally fold to be behind the placket.

At the hem, fold and press the hem. You can either press the entire hem, or just press the area next to the placket. But we want to fold it so it is in place when we sewn down the placket.

Sew down both sides of the placket. At the center front, sew 1/16" from the edge. At the opposite edge of the 1" placket, so as close as you can to the fold.
After sewing the placket, then you can stitch the binding in place, as well as the hem. The neckline will now look like the image above, on the inside of the garment.
The outside of the garment, once the plackets are overlapped, will now look like the image above. When sewing down the binding and hem, you can either start and stop your stitching at the placket stitching, as I did above, or you can sew all the way to the edge, through the placket, if you prefer. There is no right or wrong way, rather it is a personal preference.
After this, you can now sew buttonholes where you desire, and then your corresponding buttons as well. I made mine in the center of the placket, at the 1/2" mark. This was easy to find thanks to my 1/2" gingham grid. The quantity and spacing are entirely up to your preference. For comparison, my buttons are 1/2" in size. For a 1" placket, I would stay in the 3/8"–5/8" range for your buttons.

And after all of that, you will have something that looks like the dress above! Again, based on the sleeves, length, and fabric choice, you can really change the way this looks and feels with the addition of the button placket front. You can make this hack on any of the versions: the dress, maxi, or the shirt. Your choice!

This is what my neckline looks like finished, after sewing the buttonholes and buttons. Clean and polished finish with no raw edges.
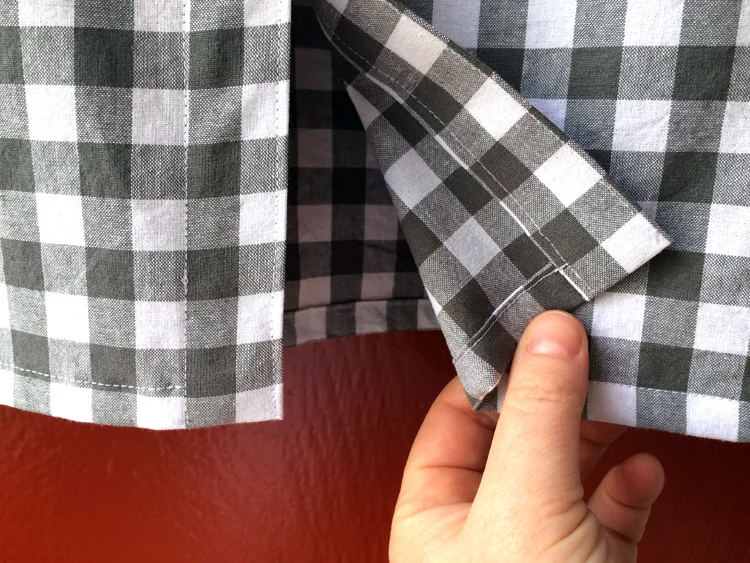
And the hem also has a nice finish, with no raw edges, or the annoying double folded hem at the placket. That is a pet peeve of mine as I can never stitch it perfectly. I'd rather tuck all that business behind the placket! Much much cleaner.
Do let me know if you have any questions or need any of the steps clarified! I'm happy to help! I can't wait to see your button up versions! Remember to use the #lottiepattern and/or #christinehaynespatterns hashtags on your photos!