Lottie Sewalong: Choosing a Size
Today on the Lottie Dress, Top, & Tunic Sewalong we are going to discuss choosing a size, fitting, and the importance of making a muslin. So let’s get to it!
Taking Your Measurements
The key measurements to take are your bust, waist, and hip. For this pattern, I also recommend taking your upper bust and the length measurement for the view you are making. Here are a few pointers for taking measurements in general:
The best is to only wear your "real" bra and undies only. If you need to be more covered due your measuring situation, wear a tight tank top and leggings over your undergarments.
Your measurements will be much more accurate if someone takes them for you, so if possible, find a buddy to help!
Use a flexible fiberglass tape measure instead of a paper, plastic, or fabric one, as all of those can shrink or stretch with time, making the measurements incorrect.
Your numbers will be different if you are looking up or down, if your arms are up or down, and if you are standing straight or hunching. Stand as you usually do, take a deep breath to relax, look straight ahead, and lower your arms to your side for the most accurate results.
If the garment's length and shoe combination is a concern, wear your intended footwear when measuring to make sure it hits where you want it to.
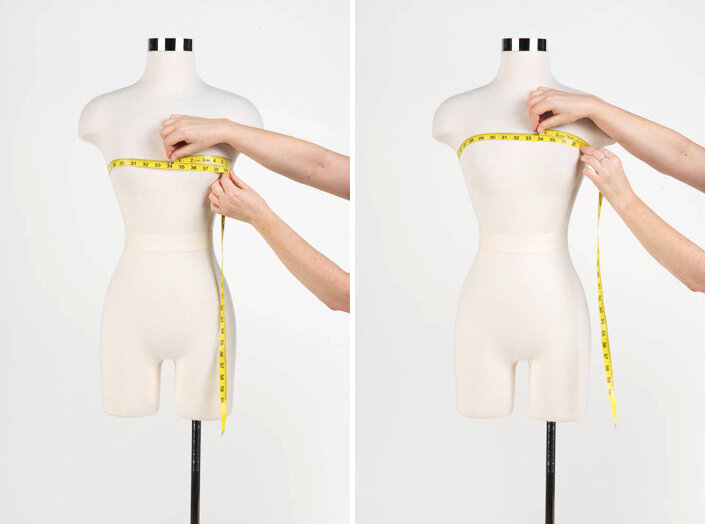
For the bust, measure across the fullest part of your bust for the correct number. That might be over the nipple, and it might not. So don't count on that as your guide. Keep the tape measure snug and level across your back.
The upper bust is the distance around your body just above the bust. Go under the arm, over the bust, and around the back. This will help you determine if you want to do a FBA or SBA, as we learned how to do in the last post.

If you bend to the side, you will crease in the middle of your body; this is your natural waist. That's where you want to take your waist measurement. Make sure it's snug, but don't suck in your stomach at the time or stand like you're doing yoga. Take a deep breath and relax so the number is correct.
The hip measurement is about 8–9" below the waist, or the fullest part of your body across the stomach and butt.
The length is measured from the back of the neck to the hem. Behind your neck at the top of your back is a neck bone. This is where you want to start. Measure to where you would ideally like the shirt, dress, or maxi length to land on your body.
Fitting the Lottie
Choosing a size to make is a combination of personal taste and the style of the garment. For example, you might like your tee shirt to have negative ease and fit your body snuggly. But someone else might prefer the tee shirt to be slightly oversized and drape around their body. Neither are right or wrong. As a designer we have to pick the "ideal" sizing for the garment, but that doesn't mean that you can't stray from that to make the garment the way you want it to fit.
The Lottie is loose and slightly oversized. That's how it will fit if you sew entirely based on the body measurements. If you prefer it to be not as loose, then you might want to go down a size. There aren't any hard and fast rules here.
Let's briefly talk about ease. Since some of you might be new sewers, you might not understand this important element in fitting. Ease is the difference between your body and the garment itself. So if you take the bust body measurement for any size below, then subtract it from the bust finished garment measurement, that number is the amount of ease that is included in the garment. 2" of ease is fitted. 3" is slightly less so, and on and on. That 2" is distributed around your whole body at the bust, so it's not 2" from the body at all points along the bust, it's 2" total.
When considering how you want the garment to fit, keep this in mind. Also note that garments like the Lottie need to be loose enough to pull on and off, so don't get to crazy about making it tight. You won't be able to get it on or off, and it won't hang the way it's suppose to.
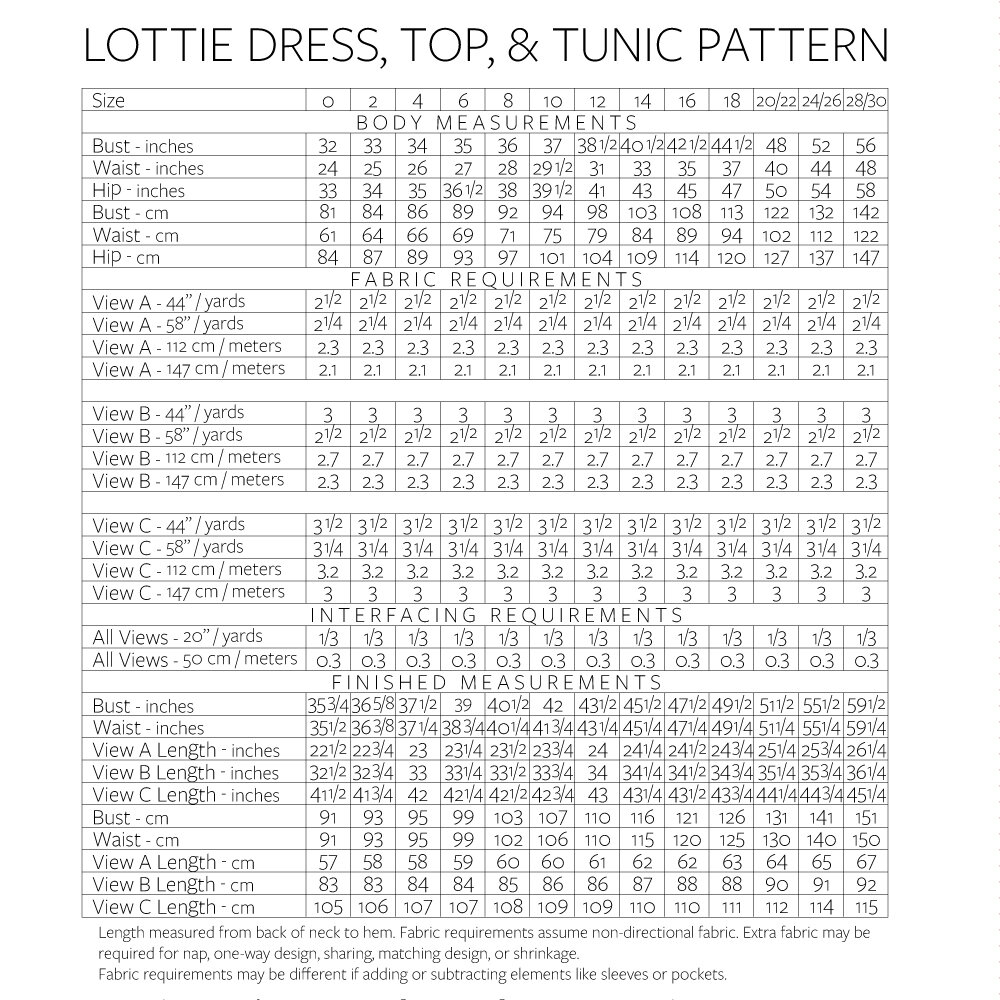
Now that you've taken your body measurements, let's compare them to the size chart and the finished garment measurements and decide what size muslin you are going to make to test the fit.
Making a Muslin
I always suggest that people sew a muslin to see how the pattern fits before cutting into your "real" fabric. Even if you've sewn one of my patterns before, there is no relationship between how the Lottie will fit you and how the Emery will fit you. The bust point will likely be in a similar place on your body, since I'm using the same block pattern to start, but the bust on the Emery is fitted, and the bust on the Lottie is not.
If you happen to fall entirely into one size chart, congratulations! That is rare. That's the size you want to sew your muslin in. Before making it in that size, as we talked about above, give the finished garment measurement numbers a glance and see if they feel right for you.
If you fall into a few sizes, I suggest making some educated guesses based on your body and apply those to your muslin. For example, If your bust is in size 8, waist in 10, and hip in 12, clearly blending from one size to the next is in store for you. You could also make the muslin in a size 10 from top to bottom, then gauge the alterations up and down from there.
There are a lot of approaches to muslin making, but one thing I always suggest: don't make more than one alteration at a time. You won't know if the garment is hanging funny because of the blending, or because of some other thing you did. Do one change, see how it fits, then change some more.
If you aren't a pattern tracer, this is a good time to start so you don't have to cut into your pattern yet. Swedish tracing paper can help you trace it off so you can test a variety of sizes as you sew muslins. Good luck with this part and take your time. It's an important step! Enjoy it!
And of course, shoot any questions in the spot below, and I will be happy to help!