Emery Dress Sewalong: Alternate Neckline Finishes, Part 2
In today’s Emery Dress Sewalong post, we are going to learn the second of two alternate methods for finishing the Emery Dress neckline. In the last post, we learned how to finish the neckline with a facing. But what if you want even less around the neck? In today’s post, I am going to show you how to finish the neckline with bias binding in place of the lining. Here we go!
HOW TO FINISH THE EMERY DRESS NECKLINE WITH BIAS BINDING
Create The Binding
Since our seam allowance around the neckline is 5/8”, we need to sew the binding on at that measurement. We are going to use double fold bias binding, so we need to take that 5/8” amount and multiply it by 4, which gives us a total width of 2.5” for our binding. Now you can use whatever you like, but if you use a narrower bias binding, the neckline will be smaller, and if you use a wider bias binding, the neckline will be bigger. So plan accordingly!
Using fabric that is quilt weight or lighter, cut 2.5” wide strips on the 45-degree angle bias across the grain. You do not need to cut one piece long enough to go around the entire neckline. Simply cut a few so once connected to each other it will go around the entire neckline.
Cut the ends of the strips at a 90-degree angle to the binding.
To connect your strips, lay one on top of another, right sides together, with the short end of the underside piece along the long edge of the piece on top and vise versa. You are going to sew from the top left corner to the lower right corner on the diagonal. I always mark this line, to help sew it perfectly straight, since you cannot use your seam allowance markings on your machine to guide you. Pin the strips in place and sew along the pink line pictured above.
Once joined, press the seam allowance open and trim so there’s about 1/4” on either side of the seam. Repeat these last two steps until your bias binding is long enough to go around your entire neckline.
Fold the binding in half, wrong sides together, and press. Continue the entire length of the binding until the whole strip is folded and pressed in half.
Open up the fold created in the last step and press each half towards the center fold, wrong sides together. The raw edges of the long edge should line up in the center fold, but not cross over the center. Continue folding and pressing the entire length of the bias binding.
Close up the entire binding and press crisp. The two folds that meet at the top edge should line up perfectly so each side are equally sized.
You should now have something that looks like the photo above!
Sew the Binding
The dress should be sewn up through the zipper insertion: the bodice is sewn, the skirt is sewn, the two are attached, and the center back is closed up with the zipper. Since the bodice will be unlined, you also will want to consider finishing all your seams at this point before attaching the bias binding.
Unzip the zipper at the back of the dress, and open up the seam allowances at the center back so they are facing inward. Starting at the center back, pin the bias binding to the neckline. Place the right side of the binding on the right side of the bodice, with the long edge of the binding in line with the neckline.
Continue pinning all the way around the neckline. I like to leave a little overhang at the center back, but any extreme excess can be cut off.
Sew the binding to the neckline at the 5/8” seam allowance, which should place you in the first fold.
Once attached, flip the binding and seam allowance up away from the bodice. Understitch through the binding and the seam allowance just above the seam from the previous step.
Trim away the seam allowance just above the understitching to reduce bulk.
Fold the binding into the inside of the bodice neckline and press well.
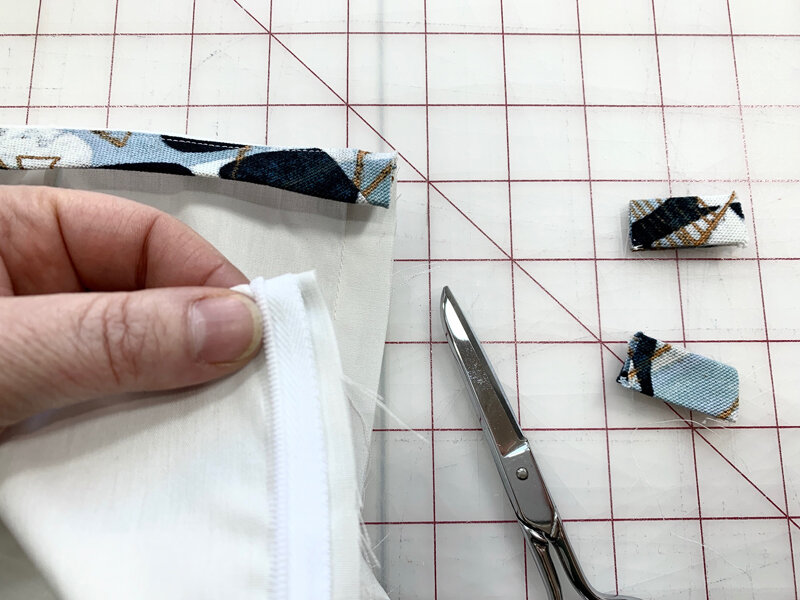
Trim the excess at the center back off in line with the center back seam allowance.
Stitch the binding down close to the bottom edge. Start and end your stitching just inside the zipper as to not sew over the zipper. The thread of your stitch can make it hard to pull the zipper over the thread, so I prefer to start just after the zipper teeth and end just before going over them on the opposite side. Once sewn, give the whole neckline a really good press using your iron and pressing ham.
At the center back, fold the seam allowance, including the binding, to the inside and pin in place. Hand tack the seam allowance on each side to keep it in place.
And that’s it! From here you can carry on with the rest of the construction. Yay!


