
Lottie Sewalong: The Neckline
Today’s Lottie Dress, Top, & Tunic Sewalong post covers the step with the most sub-steps: the neckline! In order to sew the neckline, we have to create the facing, finish the facing, sew the facing on, then understitch and trim the seam allowance down, press that all to the inside, and then topstitch it and press it again! PHEW!
But don’t worry, I am here to help you with each and every step. And, not only do I have photos for you, I shot a few videos too! So let’s get to it!
Create the Facing

If you haven’t already done so, press your interfacing to the wrong side of the facing pieces. Make sure the glue side is on top of the wrong side of the fabric. Once that is done, place your front and back facing pieces right sides together, and sew along the small shoulder seams.
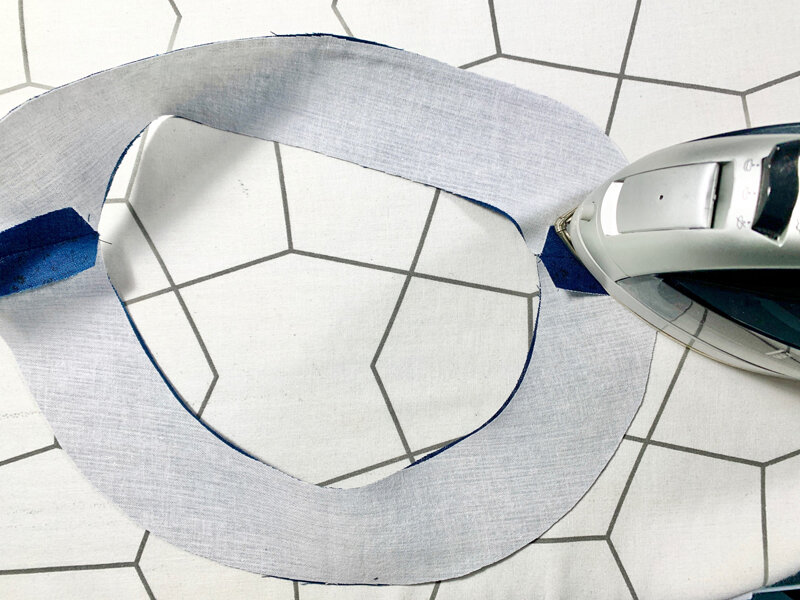
2. Press the seam allowance open on those two seams you just sewed.

3. Finish the outside edge of the facing as you choose. If you are using a serger like I am, be careful not to trim away any of the facing.

4. Press the whole facing well, especially the outer edge that you just finished.
Attach the Facing

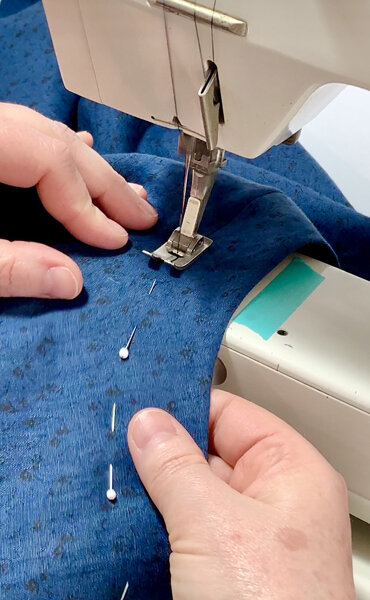
Place the facing on the neckline, right sides together. Line up at the center front, center back, and the shoulder seams and pin at those four spots first. Then pin in between, making sure to line up edges of the fabric along the inside circle of the facing and the neckline.

2. Sew the facing to the neckline at the standard 5/8” seam allowance.
Understitch the Facing

Stitch through the facing and the seam allowance, just to the inside of the stitch line where you sewed the facing on. Take your time with this step and focus only on the upcoming inch or so. Click here to watch me sew this step!

2. Very carefully trim away the seam allowance around the entire neckline. This is a perfect moment to use your 5” scissors. Take your time and always be aware of what you’re cutting! Click here to watch me do this step!

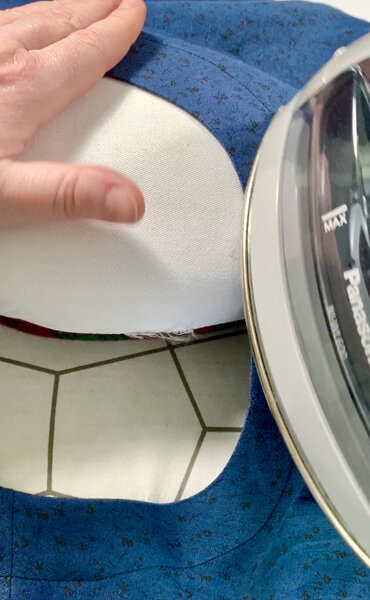
3. Turn the garment wrong side out, and flip the facing to the inside. Press the neckline seam, making sure the seam and the understitching roll to the inside. I highly recommend using your pressing ham for this step to help you press a beautiful neckline curve. Click here to watch me do this step!
Topstitch the Facing
1. Pin the facing in place and topstitch it around the neckline. You can stitch it on the inside by following the edge of the facing, or you can stitch it on the outside, by following a mark on your machine. I placed a piece of washi tape at the 1 3/8” spot, so I could follow it as a guide while topstitching on the right side of my Lottie. Click here to watch me sew this step!
2. When you’re all done, of course you should give your entire neckline another press, using your ham underneath to take the place of your body for a perfectly pressed neckline! Click here to watch me do this step!
Well done! All that we have left are the side seams and optional vents, the hem, and the optional belt sash! I will also be posting how to do the neckline with bias binding, in case you have the original Lottie pattern, or if you simply prefer that method. See you then!